Monday, 11 February 2013

Hove Actually

I've been a very busy bee since last posting properly in October 2012. From getting a part time job and wedding planning; to building my online Vintage Crockery [watch this space] business and making a hell of a lot of picnic hampers; not forgetting spending time with my rather wonderful family. Suffice to say, life has become a bit hectic.


My love for all things vintage is probably now verging on an obsession. Constantly searching for interesting pieces to upcycle and reuse, quirky goodies to add to our rather eclectic house, or just some good ol' inspiration.

Last week, my hunt led me to the rather wonderful Belle's Vintage Boot Fair in Hove (Actually), Sussex. A mixture between a table top wedding fair with rather fabulous vendors peddling their vintage wares. My favourite of these, I captured for your viewing pleasures. Enjoy...

Belle's beautiful bug
Vintage-Events vintage props
Various Stalls

Rockin' Mark Viss

The genius of Doris Loves' Temporary Tattoo Station

Did You Miss Me?


A somewhat belated Happy New Year (although right on time for Chinese New Year)!

I haven't really been anywhere, but I am back in the blogging world with a bang. My new Thrift Queen logo is now on the blog as is a link to my rapidly growing Etsy shop. I shall leave you to become re-acquainted with promises of thrifty makes and vintage finds to follow soon :-)

Saturday, 20 October 2012

Halloween On A Shoe String - Decoration


From fancy dress to decorations, Halloween can end up costing a small fortune. But follow my five decoration top tips and have yourself some thrifty thrills.

1.  A bit of fake cobweb goes a long way....


Hang in your windows or drape around pictures on your walls. This simple decoration costs around £1 per packet, or you can even use cotton wool for a similar effect. To finish the look just add a handful of creepy critters.

2.  Create spooky lighting in your home. Cluster chunky candles together, use jam jars to hold tea lights or place tall candles in wine bottles, leaving the wax to melt down the bottle.


3.  Pumpkins are one of the most iconic images of Halloween. And the good news is, they're really cheap! Get creative carving faces or words. Or why not save on all that mess and try a non-carve pumpkin design? I like kindredspiritmommy's fantastic ideas, including a decoupaged pumpkin. All you need is some Halloween paper and some pva glue. Simple!


4.  One of the easiest ways to add some Halloween horror to your home is with card. Cut out pictures of ghosts or owls and stick to the walls. Try out this free bat garland from brasspaperclip - a beautiful batty addition to your decor.


5. For those who prefer to be a little more chic than freak, stick to a simple colour scheme throughout your home - black and silver or black and purple are popular choices.

Tuesday, 2 October 2012

Our Pretty Home

Every now and again I tweet (@QueenThrift) a picture of something delicious and wonderful from around our home. I've since received a few requests for more! This is music to my ears, because I love nothing better than spending the day in second-hand shops or car boot sales rummaging for pretty thrifty finds.

VoilĂ ! Ask and you shall receive. Here are some of my favourite pieces from my two favourite rooms in our home. The Family/Living Room and the Reading Room:

THE BASEMENT (our Family/Living Room):

Too nice to keep outside
Our 6 year old's artwork
Big fan of old boxes as storage

We <3 Studio Ghibli

Even the basement door is beautiful!
Monochrome kids dvd shelves (and some art from Cuba)


My fella is a genius! Homemade entertainment unit.


GROUND FLOOR (Reading Room):

I bought Jesus from Angel market. Haggled to £20 as he has no arms!
To think, my folks wanted to throw that telly away!

Upcycled lampshade from a colander.
Totoro's home
I made these cushion from bird seed sacks.

Wednesday, 19 September 2012

The Snail Mail Revolution


I've always been a big fan of writing letters and sending cards to my nearest and dearest, it's like a hug in an envelope. There is no better feeling than receiving post that isn't a bill or a piece of junk mail, but a heart felt 'howdy' from a friend. To think that that person took the time out to sit down and write to you, is lovely, and so much more personal than reading an email or a text.

Handwritten letters from loved ones are saved, re-read, and carried about. It’s just not the same printing out a typed email to tuck under your pillow!


Life can get hectic, I seem to have so much going on at the moment that seeing everyone is a bit of a struggle. There are a lot of wonderful people in my life that unfortunately live far away, and they all deserve a nice, handwritten piece of love. 

I expect I'm not alone in feeling like this. So I put this to you, find ten spare minutes in your day to sit down with a cup of tea and let your friends know that you are thinking of them with a handwritten letter.

Let's bring back the art of writing a good letter and let snail mail glide again. Viva la revolution!

Thursday, 13 September 2012

Birthday Bonus - Guildford Gets Generous

[photo courtesy of tripadvisor.co.uk]
Thrift and 4* luxury don't usually go hand in hand, but there's always an exception.

The stunning Radisson Blu Edwardian hotel in Guildford is just that - exceptionally beautiful and exceptionally bonkers. In celebration of its first birthday, they're giving away their 111 rooms for a rather startling £1 each a night (breakfast not included), in return for a birthday card.

To bag a bed, simply send the hotel a first birthday card (to arrive before September 29th 2012) stating your contact address, email address, telephone number and preferred date of stay (between October 29th 2012 and September 28th 2013). Your card will be entered into a prize draw on October 1st 2012. It couldn't be easier.

Birthday cards should be sent to:

3 Alexandra Terrace 
High Street 
Guildford 
Surrey 
GU1 3DA

Good luck!

Thursday, 30 August 2012

Messy Time

With the end of the summer holidays drawing near, keep little ones entertained with some fantastic messy play, using everyday ingredients. My son is really into Harry Potter so I told him we were making 'potions'.


Get into the groove and make a diy lava lamp with normal household materials. The supplies needed include:
  • An empty plastic bottle
  • Water
  • Cooking oil
  • Salt
  • Food colouring
To start, fill your empty bottle 3/4 full with oil and top up with water, leaving a bit of space at the top. As water is denser than oil it should sink to the bottom. Then add a few drops of food colouring. Whist this settles, pour in a generous amount of salt and watch the amazing reaction. Once it's stopped, tip the bottle upside down and watch it start all over again. Why not recreate a Disco by turning out the lights and shining a torch onto your homemade lava lamp. Groovy man!


Fun for adults and kids alike, this oozing gooey slime will keep you entertained for hours. All you need is:
  • A plastic cup, or mixing bowl
  • Cornflour
  • Water
  • Food colouring (we used green, but any colour would work)
Simply mix 1 cup of corn flour with 1/2 a cup of water and a few drops of food colouring. The result will be an squidgy, gooey, stretchy slime that also solidifies in your hand.


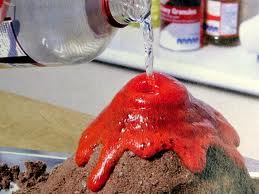
Making a volcano is a fun experiment because your child can make an actual volcano, to surround and hide the water bottle, using earth, clay or papier mache. This experiment is quite messy, so either do it outside or remember to lay a waterproof covering over your kitchen table! Ingredients needed are:
  • An empty water bottle
  • Materials for volcano surround
  • Red food colouring (to imply lava)
  • Detergent (optional but produces a better lava)
  • Water
  • Vinegar
  • Baking Powder
Sculpt your volcano around an empty water bottle. Then (using a funnel) fill the bottle most of the way up with warm water and add a few drops of red food colouring. Squeeze about 5 drops of detergent into your liquid mix and add 2 tablespoons of baking powder. When you're ready for the eruption, slowly pour the vinegar into the mix and watch the fun!

Monday, 6 August 2012

Toy House

Young children always seem to play with lots of small toys, as opposed to one big toy. My six year old in particular likes to play with army toys, and, as a result, has a growing number of little army men, tanks and helicopters.


In order to restore a bit of tidyness into his bedroom, I decided to make him a thrifty 'home' for these. The material I used were an old shoe box, a pair of scissors and some army tape - bought from an army surplus store (but also available on eBay).


I simply wrapped the box in the tape, to cover the pink writing. I also cut a whole into the side of the box for the men to climb in and out of. It took about five minutes to make, but looks really effective.


Monday, 23 July 2012

Easy Peasy Baking


I love to bake with my six year old son, but to keep his attention recipes need to be short and easy to follow. So I thought I'd share with you my three favourite bakes for people with little time and a sweet tooth!


Marshmallow Fudge
These take hardly any time to prepare and you can add your own extra flavours. Try replacing the milk with Baileys, mix in some cocoa powder, or add a dollop or two of peanut butter.

450g icing sugar
100g marshmallows
100g butter
2 tbsp milk
1/2 tsp vanilla essence

  • Grease a baking tin or line with baking paper
  • Cut marshmallows in half and put in a saucepan with butter, milk and vanilla.
  • Gently heat until everything has melted.
  • Sift icing sugar into the warm mix, stir well and then pour into baking tin.
  • Leave to harden in the fridge.


Cookie Monster Bites
These are literally the simpliest cakes to make with the minimalist of effort. Kudos to my friend Kelly for the idea.

100g softened butter
200g icing sugar
Desiccated coconut
Blue food colouring
Chocolate buttons
Chocolate chip cookies

  • Cream the butter and icing sugar to make butter icing.
  • Add the coconut and food colouring and mix together well.
  • Roll into golf ball sized balls, pressing in a dent or the mouth and leave to set in the fridge.
  • Then decorate with chocolate buttons as eyes and chocolate chip cookies in the mouth.


Mini Truffles
225g choloclate
4tbsp double cream
1 tsp vanilla essence
Hundreds and thousands/ Cocoa powder

  • Melt chocolate in a bowl over a saucepan of boiling water.
  • Add cream and stir well.
  • Leave to cool for 20minutes then add the vanilla essence.
  • Put the mixture in the fridge for an hour and a half.
  • When cool roll into small balls and decorate by either dipping into hundreds and thousands or dusting with cocoa powder


Friday, 20 July 2012

Handmade 2012: A Mouse House


Goodnight Mrs Mouse. Goodnight baby Mouse... Ok ok, so they're not mice. Clearly they are some kind of dog/ bear Sylvanian Family. Regardless, this a simple homemade present to melt the heart of any little girl.


To start with, you need a box. I used a small (about 4" x 4") gift box I found in my craft trunk. I then lined the box with some pretty wrapping paper.

For the duvet, I used two pieces of scrap material, sandwiched a small amount of wadding in the middle and sewed it shut. The same method was used for the pillow, in a co-ordinating fabric.


 All that is needed now is the mouse (or other animal) to live in the house. The result? A simple, thrifty gift.

Thursday, 19 July 2012

Recent Thrifty Puchases

I spend most Sunday's browsing car boot sales, I check out the charity shops at least once a week and I try as much as possible to peruse flea markets and street markets.

As a result, our house is filling up nicely with quirky pieces, I'm finding many items to upcycle and gift to friends and family, and after summer I shall be launching into a new business venture concerning all things Thrifty. Watch this space....

Some of my recent purchases include:

Pretty plates - £2

Picnic hamper - £5

Old map - £1.50
Gorgeous lace doilies - £4 for 12
Adidas bag - £1
Selection of glassware - £1.80
Wooden cutlery tray - £1